How to Crochet an Amish Puzzle Ball Pattern (Updated 2023)
Source: knitaholics on YouTube
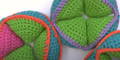
The Amish puzzle ball is a fun and simple puzzle composed of three separate parts. To solve the puzzle, you must put together those parts in the correct way to form a ball. Toys like this are not only fun to play with, but they also act as a brain exercise and support the cognitive development of children. If you’re looking for the right gift for a kid, this is definitely an excellent option. But a much better option than a store-bought toy is a hand-made one. That’s why we’ve decided to share with you a guide for crocheting an Amish puzzle ball.
Amish Puzzle Ball Pattern Information
Materials
To crochet an Amish puzzle ball using these instructions, you’ll need:
- Size 7 (4.5mm) crochet hook,
- Scissors
- Yarn needle
- Stuffing
- #4 (Aran) yarn:
- Color 1 – 2 balls
- Color 2 – 1 ball
- Color 3 – 1 ball
- Color 4 – 1 ball
For the yarn, we recommend using acrylic or an acrylic-cotton blend, such as Red Heart Super Saver or Nako Mona Lisa.
Difficulty
Intermediate level
Size
The finished ball measures around 6” in diameter. Of course, once you get the hang of it, you can make the ball as large or as small as you like.
Gauge
Your stitches should be as tight as possible. This is because you will be filling the wedges with stuffing to the brim, and we don’t want any of that stuffing seeping out between the stitches. Also, keep in mind that, despite using #4 yarn, you’re using a smaller hook – size 7, rather than the recommended size 8.
Abbreviations
The abbreviations used in this pattern include:
- Ch – chain
- Sc – single crochet
- Sc2tog – single crochet two together
- St(s) – stitch(es)
- Sl st – slip stitch
- () – repeat the instructions in the parentheses the number of times specified after
Notes
There are two things to keep in mind when following this pattern. Firstly, the first chain in each row doesn’t count as a stitch. Secondly, when you think you’re done stuffing a wedge – stuff some more. Getting the right amount of stuffing (enough so that your ball isn’t flat and shapeless, but not too much so that the stuffing doesn’t ruin your stitches) will be a matter of trial and error, so arm yourself with some patience.
How to Crochet an Amish Puzzle Ball Pattern: Step-by-Step
Instructions
To crochet an Amish puzzle ball, you will first need to crochet all the separate wedges and their lids, and then put them all together.
Wedges
Source: knitaholics on YouTube
For the entire ball, you will need to make 12 wedges using color 1.
First row: ch 2, 3 sc in the second ch from the hook, turn
Second row: ch 1, 2 sc in each st, turn
Third row: ch 1, (2 sc in next st, sc in next st) 3 times, turn
Fourth row: ch 1, (2 sc in next st, sc in next 2 sts) 3 times, turn
Fifth row: ch 1, (2 sc in next st, sc in next 3 sts) 3 times, turn
Sixth row: ch 1, (2 sc in next st, sc in next 4 sts) 3 times, turn
Seventh row: ch 1, (2 sc in next st, sc in next 5 sts) 3 times, turn
Eighth row: ch 1, (2 sc in next st, sc in next 6 sts) 3 times, turn
Ninth row: ch 1, (2 sc in next st, sc in next 7 sts) 3 times, turn
Tenth row: ch 1, (2 sc in next st, sc in next 8 sts) 3 times, ch 1, no turn
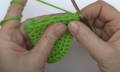
By now, you should have crocheted a half-circle. Without taking out the hook, fold the half circle, push the hook through both opposing corners, and make a single crochet. Keep going down both sides and make eight more single crochets to completely connect the two edges. Before closing the wedge, don’t forget to push the initial end of the yarn inside it.
Once you’ve connected the edges, make a chain 1 and fasten off the yarn. To deal with the final end of the yarn, push the hook through one of the stitches at the point of the wedge going from inside out, and then simply pull the yarn end through into the wedge.
And voila, you’ve made the first out of 12 wedges needed for the puzzle ball.
Chains

Source: knitaholics on YouTube
Once you have all twelve wedges, it’s time to make their lids. These lids will be connected in chains, which will in turn make putting the wedges together easier. You will need to crochet three chains, each containing four lids. Every chain should be a different color (colors 2, 3, and 4). Here’s how to make one lid:
First row: ch 2, 2 sc in the second ch from the hook, turn
Second row: ch 1, sc in each st, turn
Third row: ch 1, 2 sc in each st, turn
Fourth row: ch 1, sc in each st, turn
Fifth row: ch 1, 2 sc in the first st, sc in next 2 sts, 2 sc in the last st, turn
Sixth row: ch 1, sc in each st, turn
Seventh row: same as sixth row
Eighth row: same as sixth row
Ninth row: same as sixth row
Tenth row: ch 1, sc2tog, sc in next 2 sts, sc2tog, turn
Eleventh row: ch 1, sc in each st, turn
Twelfth row: ch 1, sc2tog twice, turn
Thirteenth row: ch 1, sc in each st, turn
Fourteenth row: ch 1, sc2tog, don’t fasten off.
Now, repeat the entire process three more times to create a chain of four wedge lids. The last lid in the chain should end with chain 1 and be fastened off.
After this, you should have one complete chain of four lids. The next step is to make two more following the same instructions.
Assembling the Segments
Source: knitaholics on YouTube
The final step in crocheting an Amish puzzle ball is putting all the pieces together. In all, you have twelve wedges and three chains with four lids each.
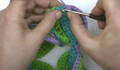
To attach wedges to the lids, you will start from one side of the chain, work your way down to the end, and then turn around and do the other side in the opposite direction. In other words, you’re connecting all four wedges at the same time, rather than one by one.
Use color 1 to make a slip knot on the hook. Place a wedge on the first lid. The seam of the wedge should be on your left if you are right-handed and vice versa. Push the hook through the first stitch on both the lid and the wedge and make a single crochet. Work your way down the edge with 14 more single crochets. Repeat the process with all four wedges and lids.
Once you’ve worked your way down the lid chain on one side, repeat the process on the other side to close the wedges. Don’t forget to stuff them along the way!
When you’re done closing the wedges, join the last stitch with the first one on the opposite end and fasten off.
Building the Amish Puzzle Ball
By now, you should have the first of the three segments of the ball done. Repeat the process for the rest of the eight wedges and two chains of lids. Now comes the puzzle part – putting the segments together into a ball. First, pull one segment over the other to create a cross. Then, pull the third one over the other two so that its edges fit snugly in the inner corners of the cross.
