How to Punch Needle with Yarn - Beginner’s Guide
Whether you’re just getting into yarn crafts and embroidery or you’re a seasoned pro, punch needle is a fun and easy way to make exciting patterns and boost your confidence to try the more complicated techniques. But what is needle punching exactly and what do you need to get started? Read on to learn how to punch needle with yarn like a pro!
What is a Punch Needle?
A punch needle is a tool used, well, for needle punching. It is shaped like a thick pen or a marker, making it quite easy to hold and maneuver. Most commonly, it is made of wood or plastic. The tip of the pen is a hollow needle with the needle eye located close to the angled tip. The needle is used to tightly pack (i.e. “punch”) loops of yarn (or thread, if that’s your material of choice) into a fabric.
What is Punch Needle Embroidery?
Punch needle embroidery is an embroidery technique that uses the punch needle. The setup is similar to regular embroidery — there is the foundation fabric that needs to be embroidered, a hoop used to keep the fabric in place, yarn of your choice, and a set of auxiliary tools you will need, such as scissors. However, instead of using typical embroidery needles, you will need a punch needle.
Is Punch Needle Easy?
In general, needle punching is considered easier than many other, more manual embroidering techniques, such as cross stitching. However, that doesn’t mean that it takes no time to pick up. If you have attempted needle punching before and been unsuccessful, don’t be discouraged. Much like any craft, punch needle takes practice.
Punch Needle Sizes
Punch needles aren’t exactly a one-size-fits-all type of tool. There are two major variables to keep in mind when choosing the right-sized punch needle:
- Length: The length of the needle will affect the length of the yarn loops you create. This will have a huge impact on the final look and texture of your project.
- Width: The width of the needle determines the thickness (or weight) of the yarn you can use. The wider the needle, the heavier the yarn.
However, aside from considering the size of the needle itself, you should also pay attention to the handle. Depending on the complexity of your project, needle punching can take hours, if not days. That is why it is important to choose a shape handle that feels comfortable in your hand.
Punch Needle vs. Rug Hooking: What’s the Difference?
The final products of punch needle and rug hooking look quite similar and may sometimes be mistaken for one another. However, there are some major differences. Firstly, yarn needle punching requires a straight, hollow needle with a slanted tip. On the other hand, rug hooking requires a hooking tool not too unlike crocheting hooks. Secondly, with needle punching, you are, quite literally, punching the loops into the fabric, while rug hooking involves pulling the loops up through the fabric.
How Do Punch Needles Work?
The fundamentals of a punch needle are really quite simple. The needle works by forcing the thread through the foundation fabric to the other side. When you retract the needle, the thread stays put, thus creating a loop. When these loops are packed tightly together, they will hold the pattern in place as you continue to work.
Since needle punching requires you to work from the back side of the fabric (for instance, the inside of a clothing garment), designs are often mirrored. However, modern punch needle projects often display the back side instead, as it also usually ends up having an interesting pattern.
Punch Needle Tools
In order to get started with yarn needle punching, you will need some basic tools (that is, on top of the punch needle itself).
Foundation Fabrics
The choice of foundation fabric is quite important for needle punching. Twelve-count monk’s cloth is generally believed to be the best option, especially for larger needles. It is made of 100% cotton with an even weave, and it has just the right balance between soft and sturdy to keep your loops in place.
It is important not to confuse 12-count monk’s cloth, which has twelve holes per inch, with 7-count monk’s cloth, which has seven holes per inch and is generally more commonly found in arts and crafts stores.
Aside from 12-count monk’s cloth, other fabrics you can use include linen (both regular and primitive), rug warp, weavers cloth, and cotton denim.
On the other hand, on top of the 7-count monk’s cloth, some fabrics to avoid include Aida cloth and burlap.
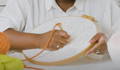
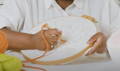
Frames
Using the wrong hoop or frame can really make your job difficult. When choosing a frame to use, make sure to go for the no-slip kind, as needle punching can put quite a bit of pressure on the fabric. Using a looser hoop will force you to stop and readjust your fabric every few minutes.
Another good option is gripper frames, which have rows of miniature metal hooks that ensure the fabric stays in place. These frames are likely the most secure option as they really prevent the fabric from moving at all, but they can also be quite expensive.
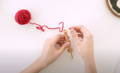
Yarns
The type of yarn to use for your punch needle project will depend on exactly what you’re working on. For instance, for rugs and other items that have to withstand a lot of wear and tear, wool yarn is probably the best option.
However, if you’re working on a more delicate project, such as pillows, wall decor, or other home decoration projects, you can be more flexible in your choice of yarn. Some options to consider are bulky craft yarn and worsted yarn. The important thing to remember is that you should avoid yarns with uneven thickness or bumps, as these can get stuck in the fabric and mess up your loops.
Design
The last thing you will need to get started with your needle-punching project is a design. Of course, you can always free-hand it, but if you’re still new to the craft, it might be a good idea to get started with some beginner-friendly patterns and work your way up to more complex designs.
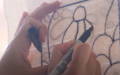
How to Thread a Punch Needle
There are two methods of threading a punch needle depending on the type of needle you have. Some needles have an open slot running along the entire needle and handle, making it easy to thread them. If this is the type of needle you have, all you have to do is push your yarn through the slot and then thread it through the eye of the needle itself.
However, if your needle doesn’t have this slot, you will need a threading wire. Here’s a quick step-by-step guide on how to do it:
Step 1:Insert the threader through the punch needle from the tip side.
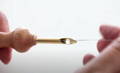
Step 3: Pull the threader back out of the punch needle, pulling along the thread with it.

Now, you’ll have to pull the yarn through the eye of the needle. To do this, you can either fold your yarn and push it through the needle manually, or use the same technique with a threader. Simply push the threader through the eye of the needle, from the outside in, pull the yarn through the threader, and pull the threader out.
What Yarn is Best to Use for Punch Needle?
The best yarn to use for punch needle is wool yarn, as it can sustain a lot of wear and tear. However, for decoration projects, you can also use thinner yarns, such as bulky and worsted weight yarns.
What Size Yarn Do You Need for Punch Needle?
The best size yarn for punch needle depends on the thickness of the needle you’re using. The thicker the needle, the thicker the yarn. For example, for Oxford regular punch needles, the best size wool yarn is 8 to 10. If you have a finer needle, you can go for sizes 4 to 6.
Can You Use Acrylic Yarn for Punch Needle?
Yes, you can use acrylic yarn for punch needle projects. However, it’s best to reserve acrylic yarn for decorative projects, such as wall hangings, since it is not durable enough for rugs.
Some of the benefits of using acrylic yarn for decorations include a wider choice of colors than most other materials, ease of use for beginners, and affordability.
What Is the Best Needle Punching Fabric?
The best fabric for needle punching is a 12-count monk’s cloth. Alternatives to consider include linen, rug warp, weavers cloth, and cotton.
What Is the Best Embroidery Hoop for Punch Needle?
The best embroidery hoop for punch needle is a no-slip hoop. Since needle punching can be a little rough on the fabric, it is important to use a firm hoop that will hold it in place. Another alternative is a grip frame, although these tend to be more expensive.
How to Transfer a Punch Needle Pattern
If you’re using a premade printed design for your punch needle project, you will first need to transfer the print. But before we get to the best way to do this, you will need to decide which side of your punch needle fabric will be displayed. If you go for the looped side, you will need to mirror the pattern first, as needle punching is technically working from the back of the fabric. However, if you’re going for a more modern look and want to use the flatter side, there is no need to mirror the pattern.
One of the easiest ways to transfer a punch needle pattern onto the fabric is by taping the print on your window. Then, tape the fabric on top of the pattern, making sure that it is evenly stretched on all sides. The light coming from the outside will make the design more visible through the fabric. Finally, take a fabric marker, or even just a regular pencil, and carefully trace over the pattern. Of course, you can also use a lightbox to do this, but if you don’t have one, a window on a sunny day will do just fine.
Ideally, you’ll want to transfer the pattern before placing your fabric in the hoop or frame. However, for simpler designs, you can trace the lines once the fabric is already stretched out and secured in the frame. Simply tape the print on top of it and trace away.
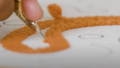
How to Use a Punch Needle
So you’ve picked the right materials, chosen your design, and transferred the pattern onto the fabric. Now it’s time to actually get down to business. Using a punch needle is no rocket science, but knowing how to do it right will still make your job much easier.
Hold the needle as if you were holding a pen. The open slot of the needle should be pointing in the direction you’ll be working. Push the needle through the fabric all the way to the handle. Pull the tail end of the fabric to the loop (back) side.
Now, take the needle back out. IMPORTANT: be careful not to move the needle too far away from the fabric. Ideally, you will want the tip of the needle touching the fabric at all times, lightly grazing it as you move the tool.
Move the needle one to three holes away and repeat the process.
See? We promised it was simple! However, there are still some important things to keep in mind:
- The outline stitches of the pattern should be packed more tightly. Try to shoot for around 6 stitches per inch.
- the filler stitches, i.e. the surface inside the outline, can be a little looser, at around 4 stitches per inch.
- Parallel stitches should resemble brick patterns. In other words, each row should alternate so that the punched hole is positioned in the middle of the next row’s stitch.
- When turning corners, make sure to punch the tip of the corner. While the needle is punched down, slowly rotate it in the direction you’re turning, and keep stitching as usual. This will ensure that your corners are sharp.
Finishing Your Punch Needle Project
Once you’re done punching the needle, it’s time to clean up and finalize your project. First, cut the yarn to remove the needle. Optionally, you can pull the tail through the other side of the fabric and trim it so that it is the same length as the loops.
If the loop side of your project is looking a little messy, don’t worry — that’s the way it’s supposed to be. Now, to clean it up, the first order of business is trimming the loose ends so that they match the rest of the pattern in length and don’t stand out.
Then, use the tip of your needle (unthreaded), small scissors, or a chopstick to poke and tuck in any funny-looking loops until you’re satisfied with the final look of your project. Keep in mind, though, that if you’re planning to display the non-looped side, there is no need to tuck the loops back in.
Punch Needle Troubleshooting
Despite needle punching being relatively simple, there are still some things that could go wrong. Some issues that you may face, especially as a beginner, are loops that keep unraveling, are uneven, or have gaps between them. If you’re experiencing any of these problems, do the following:
- Check that your fabric is evenly stretched;
- Ensure that the frame or hoop is holding the fabric firmly in place;
- Make sure you’re not pulling the needle too far from the fabric;
- Make sure that you’re pressing the needle all the way down;
- Keep your stitches even at 1-3 holes away from each other;
- Untangle your yarn and check that it is not getting stuck somewhere (such as under your arm or an object on the table).
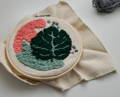
Punch Needle Project Ideas
Originally, needle punching was intended to be a rug-making technique. However, we nowadays use it for all kinds of projects, especially decorative ones. Here are some things you can make with punch needle:
- Hanging wall decor
- Pillow and cushion covers
- Stuffed animals
- Pot and mug coasters
- Patches for clothing garments
- Christmas and Halloween ornaments
Regardless of what type of project you choose, what matters is that you play around, let your imagination run wild, and most importantly, have fun!
